Untuk bisa berkomunikasi melalui internet, mikrokontroler dapat menggunakan gateway jaringan berupa ethernet atau WiFi. Jika menggunakan WiFi, mikrokontroler perlu mencari dan mengidentifikasi jaringan WiFi disekitarnya lalu meng-connect pada jaringan tersebut. Pada pengenalan kali ini, akan dibahas bagaimana cara untuk search dan connect ke WiFi menggunakan Development Board Arduino MKR1000.
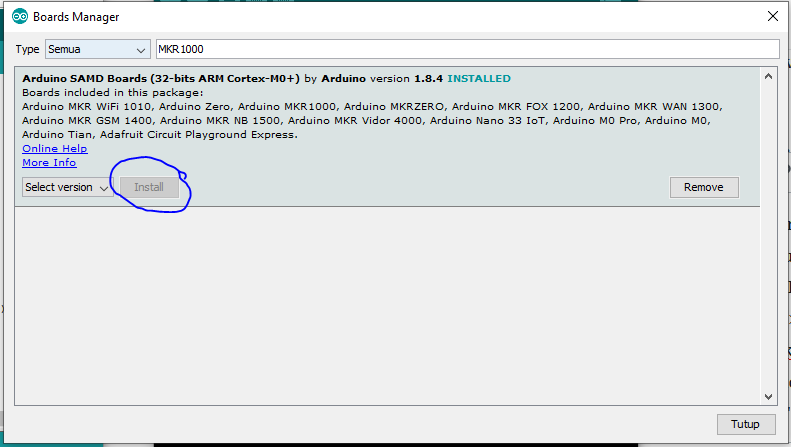
Untuk menggunakan Arduino MKR 1000, kita harus menginstall board Arduino MKR1000 dan library WiFi101 pada Arduino IDE kita. Untuk menginstall board, pilih menu tools>board>board manager>ketik “MKR1000” lalu enter>klik install.
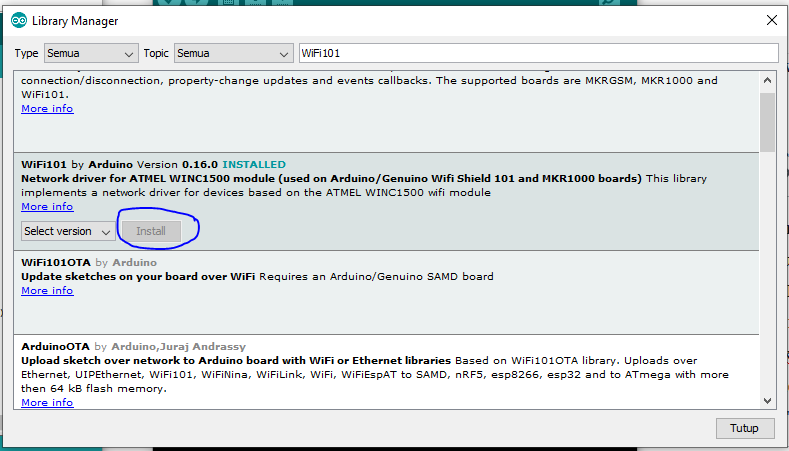
Untuk menginstal library, pilih menu sketch>include library>manage library>ketik “WiFi101” lalu enter>klik install.
1. Search WiFi
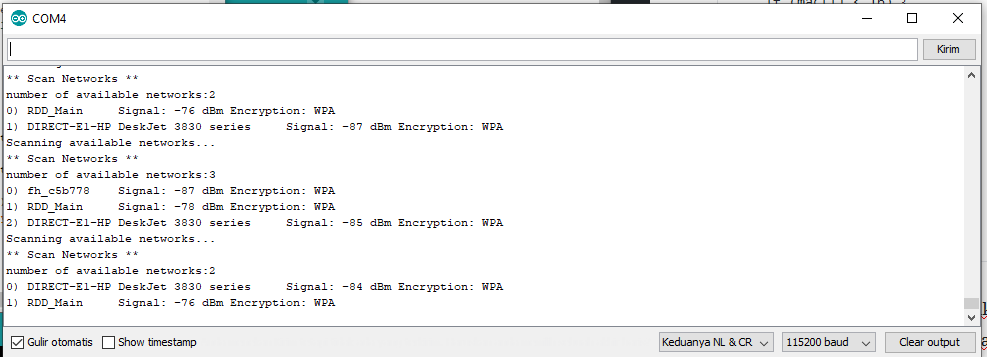
Setelah terinstall, kita coba Arduino MKR1000 ini untuk men-scan WiFi disekitar dengan menggunakan program contoh ScanNetworks dibawah ini (example>WiFi101>ScanNetworks). Jangan lupa untuk memilih boarnya pada MKR1000 sebelum mengupload program.
/*

 This example  prints the WiFi shield's MAC address, and
 scans for available WiFi networks using the WiFi shield.
 Every ten seconds, it scans again. It doesn't actually
 connect to any network, so no encryption scheme is specified.

 Circuit:
 * WiFi shield attached

 created 13 July 2010
 by dlf (Metodo2 srl)
 modified 21 Junn 2012
 by Tom Igoe and Jaymes Dec
 */


#include <SPI.h>
#include <WiFi101.h>

void setup() {
  //Initialize serial and wait for port to open:
  Serial.begin(9600);
  while (!Serial) {
    ; // wait for serial port to connect. Needed for native USB port only
  }

  // check for the presence of the shield:
  if (WiFi.status() == WL_NO_SHIELD) {
    Serial.println("WiFi shield not present");
    // don't continue:
    while (true);
  }

  // Print WiFi MAC address:
  printMacAddress();

  // scan for existing networks:
  Serial.println("Scanning available networks...");
  listNetworks();
}

void loop() {
  delay(2000);
  // scan for existing networks:
  Serial.println("Scanning available networks...");
  listNetworks();
}

void printMacAddress() {
  // the MAC address of your WiFi shield
  byte mac[6];

  // print your MAC address:
  WiFi.macAddress(mac);
  Serial.print("MAC: ");
  printMacAddress(mac);
}

void listNetworks() {
  // scan for nearby networks:
  Serial.println("** Scan Networks **");
  int numSsid = WiFi.scanNetworks();
  if (numSsid == -1)
  {
    Serial.println("Couldn't get a wifi connection");
    while (true);
  }

  // print the list of networks seen:
  Serial.print("number of available networks:");
  Serial.println(numSsid);

  // print the network number and name for each network found:
  for (int thisNet = 0; thisNet < numSsid; thisNet++) {
    Serial.print(thisNet);
    Serial.print(") ");
    Serial.print(WiFi.SSID(thisNet));
    Serial.print("\tSignal: ");
    Serial.print(WiFi.RSSI(thisNet));
    Serial.print(" dBm");
    Serial.print("\tEncryption: ");
    printEncryptionType(WiFi.encryptionType(thisNet));
    Serial.flush();
  }
}

void printEncryptionType(int thisType) {
  // read the encryption type and print out the name:
  switch (thisType) {
    case ENC_TYPE_WEP:
      Serial.println("WEP");
      break;
    case ENC_TYPE_TKIP:
      Serial.println("WPA");
      break;
    case ENC_TYPE_CCMP:
      Serial.println("WPA2");
      break;
    case ENC_TYPE_NONE:
      Serial.println("None");
      break;
    case ENC_TYPE_AUTO:
      Serial.println("Auto");
      break;
  }
}

void printMacAddress(byte mac[]) {
  for (int i = 5; i >= 0; i--) {
    if (mac[i] < 16) {
      Serial.print("0");
    }
    Serial.print(mac[i], HEX);
    if (i > 0) {
      Serial.print(":");
    }
  }
  Serial.println();
}
Program ini memerintahkan mikrokontroler untuk men-scan jaringan WiFi di sekitarnya dan memasukannya kedalam list. List ini berisi nama jaringan (SSID), kekuatan jaringan (signal strength / RSSI), dan jenis enkripsinya. Scan ini diulangi tiap 10 detik.
2. Connect to WiFi
Untuk menyambung kedalam jaringan WiFi kita dapat menggunakan program contoh yang tersedia. Pada program contoh tersedia tiga jenis enkripsi yaitu tidak menggunakan enkripsi, WEP dan WPA. Untuk pengenalan ini kita ambil yang WPA. Programnya adalah seperti berikut (example>WiFi101>ConnectWithWPA):
/*

 This example connects to an unencrypted WiFi network.
 Then it prints the  MAC address of the WiFi shield,
 the IP address obtained, and other network details.

 Circuit:
 * WiFi shield attached

 created 13 July 2010
 by dlf (Metodo2 srl)
 modified 31 May 2012
 by Tom Igoe
 */
#include <SPI.h>
#include <WiFi101.h>

#include "arduino_secrets.h"
///////please enter your sensitive data in the Secret tab/arduino_secrets.h
char ssid[] = SECRET_SSID;        // your network SSID (name)
char pass[] = SECRET_PASS;    // your network password (use for WPA, or use as key for WEP)
int status = WL_IDLE_STATUS;     // the WiFi radio's status

void setup() {
  //Initialize serial and wait for port to open:
  Serial.begin(9600);
  while (!Serial) {
    ; // wait for serial port to connect. Needed for native USB port only
  }

  // check for the presence of the shield:
  if (WiFi.status() == WL_NO_SHIELD) {
    Serial.println("WiFi shield not present");
    // don't continue:
    while (true);
  }

  // attempt to connect to WiFi network:
  while ( status != WL_CONNECTED) {
    Serial.print("Attempting to connect to WPA SSID: ");
    Serial.println(ssid);
    // Connect to WPA/WPA2 network:
    status = WiFi.begin(ssid, pass);

    // wait 10 seconds for connection:
    delay(10000);
  }

  // you're connected now, so print out the data:
  Serial.print("You're connected to the network");
  printCurrentNet();
  printWiFiData();

}

void loop() {
  // check the network connection once every 10 seconds:
  delay(10000);
  printCurrentNet();
}

void printWiFiData() {
  // print your WiFi shield's IP address:
  IPAddress ip = WiFi.localIP();
  Serial.print("IP Address: ");
  Serial.println(ip);
  Serial.println(ip);

  // print your MAC address:
  byte mac[6];
  WiFi.macAddress(mac);
  Serial.print("MAC address: ");
  printMacAddress(mac);

}

void printCurrentNet() {
  // print the SSID of the network you're attached to:
  Serial.print("SSID: ");
  Serial.println(WiFi.SSID());

  // print the MAC address of the router you're attached to:
  byte bssid[6];
  WiFi.BSSID(bssid);
  Serial.print("BSSID: ");
  printMacAddress(bssid);

  // print the received signal strength:
  long rssi = WiFi.RSSI();
  Serial.print("signal strength (RSSI):");
  Serial.println(rssi);

  // print the encryption type:
  byte encryption = WiFi.encryptionType();
  Serial.print("Encryption Type:");
  Serial.println(encryption, HEX);
  Serial.println();
}

void printMacAddress(byte mac[]) {
  for (int i = 5; i >= 0; i--) {
    if (mac[i] < 16) {
      Serial.print("0");
    }
    Serial.print(mac[i], HEX);
    if (i > 0) {
      Serial.print(":");
    }
  }
  Serial.println();
}
Kita hanya perlu mengisi SSID WiFi (nama jaringan) dengan tanda dan passwordnya pada variable ssid[] dan pass [] dengan tanda kutip (” “) atau bisa diisi pada tab arduino_secrets.h.
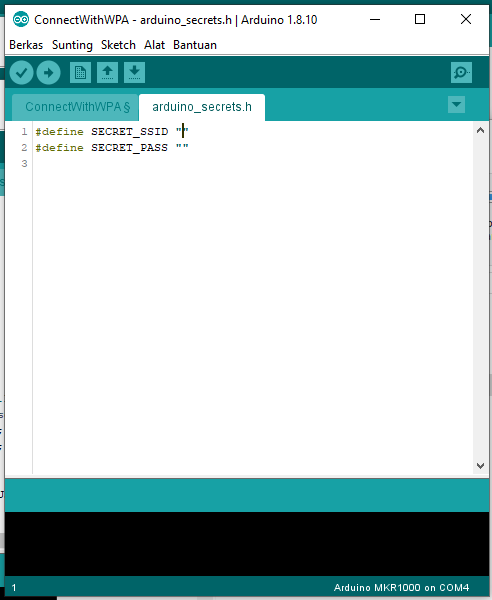
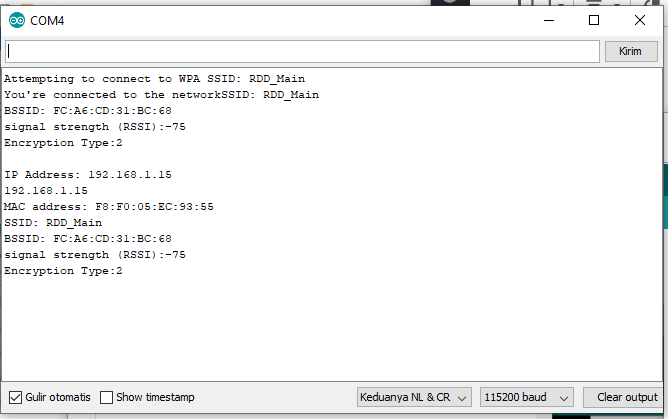
Pada gambar diatas menunjukan bahwa MKR1000 telah terkoneksi pada jaringan WiFI RDD_Main.
Leave A Comment?